
Sunday, December 28, 2014
Understanding The Bones Of The Human Hand To Improve Your Hand Drawings Lesson

Before you can draw the hand realistically, you need to acquaint yourself with the underlying
bone structure.
bone structure.
There are three types of bones in the hand; phalanges, metacarpals, and carpals.
Combined, these bones give the hand and fingers an extremely varied and
wide range of motion, such that drawing the hand can become highly
complicated.
You
should not only have an anatomy book nearby when you draw, you should
also develop your own reference sheets such as this drawing below.
Drawing
the bones yourself forces you to visualize how the structure fits
together, makes you focus on individual bone shapes, and will give you
better recall when it comes time to make a finished drawing.
Knowing
the bone structure will give you a better understanding of the exterior
hand as well, because the shape of the bones help dictate the shape of
the
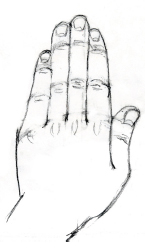
hand. For instance, notice that the three phalange bones of each finger become
gradually smaller and shorter as they extend up the fingers.
hand. For instance, notice that the three phalange bones of each finger become
gradually smaller and shorter as they extend up the fingers.
Because of that, the shape of the fingers are tapered from base to tip,
and you can see lines from the back and front at the joints that divide
the fingers into three nearly equal sections.
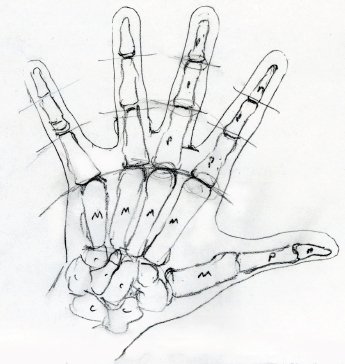
Because the metacarpal bone is more rounded than the phanlange bones, the
knuckle made where those two join looks different from the outside than the
fairly squared off phalange joints.
knuckle made where those two join looks different from the outside than the
fairly squared off phalange joints.
And because of the way the thumb's metacarpal is joined to the carpals, the thumb has wider range of motion than the fingers.
In
addition to studying the bones, take time to examine the muscles and
tendons. You can gain a good understanding by moving your own hand,
flexing and twisting to see how the hand changes in different positions,
but the key to improvement is actually drawing the hand over and over
again from many different angles.
Draw
from life or reference materials, and remember, it's not easy. Don't be
disappointed if your first attempts aren't successful; keep working and
you will see improvement.
 Want To Learn More...
Learn how to draw realist hands in different positions and from different angles taught by a real professional artist.
Hand Mastery is generously illustrated showing you step-by-step how to draw hands that look realistic.
With clear (and fun) instructions on how to draw ... you'll learn at your own pace in the comfort of your home.
You
get high definition videos with simple and easy to follow written
instructions so you know exactly how to make your drawings jump off the
page.
Warm Regards

Chris Elmore
Drawing Made Easy
Chris Elmore
Drawing Made Easy
Zesty Mexican Soup Recipe
Today's Recipe
If you don't know what to serve for dinner tonight ...
This spicy vegetable soup is full of flavor, and easy to prepare, and is the perfect addition to your Healthiest Way of Eating. during the cold winter months. It's a great way to incorporate a variety of vegetables into on meal and it actually gets better with time.
Zesty Mexican Soup

Prep and Cook Time: 40 minutes
Ingredients:
If you don't know what to serve for dinner tonight ...
This spicy vegetable soup is full of flavor, and easy to prepare, and is the perfect addition to your Healthiest Way of Eating. during the cold winter months. It's a great way to incorporate a variety of vegetables into on meal and it actually gets better with time.
Ingredients:
- 1 medium onion, minced
- 4 medium cloves garlic, chopped
- 2 TBS red chili powder
- 3 cups + 1 TBS chicken or vegetable broth
- 1 small to medium green bell pepper, diced into 1/4-inch pieces
- 1 small zucchini, diced into 1/4-inch pieces
- 1 cup finely chopped collard greens
- 1 15 oz can (BPA free) diced tomatoes
- 2 cups or 1 15 oz can (BPA free) black beans, rinsed
- 1 cup frozen yellow corn
- 1 4 oz can (BPA free) diced green chili
- 1 tsp dried oregano
- 1 tsp ground cumin
- 1/4 cup chopped pumpkin seeds
- 1/2 cup chopped fresh cilantro
- salt and pepper to taste
- Heat 1 TBS broth in a medium soup pot. Healthy Saut� onion, garlic, and green peppers in broth over medium heat for about 5 minutes, stirring often.
- Add red chili powder and mix in well. Add broth, zucchini, collard greens, and tomatoes. Cook for another 5 minutes and add beans, corn, green chili, oregano, and cumin.
- Bring to a boil on high heat. Once it begins to boil, reduce heat to medium-low and simmer uncovered for 15 minutes longer. (Simmering uncovered enhances the flavor.) Add chopped cilantro, pumpkin seeds, salt, and pepper.
- Romaine & Avocado Salad
10 New Year's Resolutions That Are Bad for Your Health

Set Your Resolutions Right in 2015
When the ball drops on New Year’s Eve, it renews our desire to make positive changes in the year to come — and you’d be hard-pressed to find someone who doesn’t have a diet- or fitness-related resolution on their list. While recommitting to your health goals is important — whether it’s eating better, getting fit, or losing 40 pounds — some resolutions can actually do more harm than good. Before you wake up on January 1, leave these ten unhealthy tactics in 2014 and make 2015 your healthiest year yet.heClick here to see the solutions:


Mushroom, Tomato, Basil Frittata - Healthy Food Tip and Recipe
Today's Recipe
If you don't know what to serve for dinner tonight ...
Frittatas such as this one are a great addition to your Healthiest Way of Eating any time of day. They not only provide great flavor one serving contains only 144 calories. Enjoy!
Mushroom, Tomato, Basil Frittata

Prep and Cook Time: 20 minutes
Ingredients:
In-Depth Nutritional Profile for Mushroom, Tomato, Basil Frittata
Healthy Food Tip
Most people recognize, to varying extents of course, that what they eat (or don't eat) impacts their overall health. And, because of this recognition, many people try to eat more fruits and vegetables, less saturated fat and cholesterol, and cut out junk foods.
However, it is important to remember that what you drink (or don't drink) also impacts your health. If you are careful to eat well, but drink excessive amounts of soda, fruit beverages, coffee, black tea, and/or alcohol you may not be as healthy as you could be. That is because such beverages contain a variety of substances that, when taken in excess, are not health-giving. These substances include refined or artificial sweeteners, artificial flavorings, artificial colorings, synthetic preservatives, and caffeine. In order to keep your beverage choices at the same peak nourishment level as your food choices, here are my recommendations:
Water: You can't go wrong with high-quality water. This beverage is not only at the top of my list, it is in a category all its own. While your water intake needs will vary from day to day, in its Dietary Reference Intake (DRI) recommendations, the National Academy of Sciences recommends about 13 cups of water each day for men and 9 cups for women. Space your intake throughout the day, make sure to re-hydrate during and after exercise, and steer clear of excess water drinking during meal times if you find that practice to be personally helpful. For the highest quality water, I recommend attaching a high-quality filter to your tap water supply and drinking this filtered tap water as your primary source of water. You can also purchase high-quality bottled mineral waters and spring waters at most grocery stores. To give yourself plenty of easy access to home-filtered waters, you may want to purchase an easy-to-carry water bottle and refill it whenever you are home so that you can have water with you when you are on the go. Be sure to purchase a "BPA-free" bottle if you're getting a hard plastic (polycarbonate) bottle. ("BPA" stands for bisphenol A, a problematic toxin that has often been added to polycarbonate plastics.)
100% fruit juices: Fruit juice can be healthy when it is 100% fruit juice, with no added sweeteners. But, keep in mind, that juice can pack a powerful punch in terms of calories and sugar, so it may not be wise to consume a lot of juice, even 100% fruit juice, if you are trying to drop a few pounds or have blood sugar regulation concerns. To take full advantage of the nutrients available in the fruit, press or juice the fruit at home, and consume it immediately. If you want to buy fruit juice at a grocery store, keep in mind that 100% fruit juice is harder to find than you might think as many fruit beverages sold in supermarkets contain only a small percentage (usually less than 10%) of actual fruit juice. For a special occasi on, instead of serving soda, make a refreshing and healthy punch by combining sparkling water with 100% cranberry juice, ice, and orange slices in a large bowl.
Iced herbal tea: Instead of regular iced tea, treat yourself to a cool drink of herbal iced tea. Many herbs are rich in powerful antioxidants, which support the immune system and overall health. Brew the tea stronger than you would if you were planning to serve the tea hot and then add ice and a sprig of mint or a slice of lemon. Peppermint tea is wonderful when served cold. Or, try a combination of various herbs: chamomile, hibiscus flower, lemon grass, orange peel, rose hips, and strawberry leaf.
Healthier Lifestyle Tea: Healthier Lifestyle Tea is the name I have given to a delicious and health-supporting beverage made of one cup of green tea and one teaspoon of lemon juice. Green tea is both delicious and renowned for its health-promoting properties. Many of its health benefits have been linked with the catechin phytonutrients, such as epigallocatechin-3-gallate (EGCG), that it contains. Catechins are antioxidants, which have heart-supportive and anti-cancer properties. The lemon juice adds a refreshing flavor to the tea and is experienced by many people as a perfect complement to the tea, which makes it especially satisfying. Healthier Lifestyle Tea can be enjoyed hot or iced. If you are sensitive to caffeine, you can make it with decaffeinated green tea.
If you don't know what to serve for dinner tonight ...
Frittatas such as this one are a great addition to your Healthiest Way of Eating any time of day. They not only provide great flavor one serving contains only 144 calories. Enjoy!
Ingredients:
- 1/2 medium onion, minced
- 3 medium cloves garlic, pressed
- 1 TBS +1 TBS chicken broth
- 1 cup thinly sliced crimini mushrooms
- 1/2 medium tomato diced
- 3 large eggs
- 3 TBS chopped fresh basil
- salt and black pepper to taste
- Mince onions and press garlic and let sit for 5 minutes to bring out their hidden health benefits.
- Heat 1 TBS broth in a 10-inch stainless steel skillet. Healthy Sauté onion over medium low heat for 3 minutes, stirring frequently.
- Add garlic and mushrooms and continue to sauté for another 2 minutes.
- Add 1 TBS broth, tomato, salt, and pepper and cook for another minute. Stir well, and gently scrape pan with a wooden spoon to remove any slight burning.
- Beat eggs well, and season with salt and pepper. Mix in chopped basil. Pour eggs over vegetables evenly and turn heat to low. Cover and cook for about 5 minutes, or until firm. Cut into wedges and serve.
In-Depth Nutritional Profile for Mushroom, Tomato, Basil Frittata
Healthy Food Tip
What are some healthy beverages that would fit well in my "Healthiest Way of Eating"?
Most people recognize, to varying extents of course, that what they eat (or don't eat) impacts their overall health. And, because of this recognition, many people try to eat more fruits and vegetables, less saturated fat and cholesterol, and cut out junk foods.
However, it is important to remember that what you drink (or don't drink) also impacts your health. If you are careful to eat well, but drink excessive amounts of soda, fruit beverages, coffee, black tea, and/or alcohol you may not be as healthy as you could be. That is because such beverages contain a variety of substances that, when taken in excess, are not health-giving. These substances include refined or artificial sweeteners, artificial flavorings, artificial colorings, synthetic preservatives, and caffeine. In order to keep your beverage choices at the same peak nourishment level as your food choices, here are my recommendations:
Water: You can't go wrong with high-quality water. This beverage is not only at the top of my list, it is in a category all its own. While your water intake needs will vary from day to day, in its Dietary Reference Intake (DRI) recommendations, the National Academy of Sciences recommends about 13 cups of water each day for men and 9 cups for women. Space your intake throughout the day, make sure to re-hydrate during and after exercise, and steer clear of excess water drinking during meal times if you find that practice to be personally helpful. For the highest quality water, I recommend attaching a high-quality filter to your tap water supply and drinking this filtered tap water as your primary source of water. You can also purchase high-quality bottled mineral waters and spring waters at most grocery stores. To give yourself plenty of easy access to home-filtered waters, you may want to purchase an easy-to-carry water bottle and refill it whenever you are home so that you can have water with you when you are on the go. Be sure to purchase a "BPA-free" bottle if you're getting a hard plastic (polycarbonate) bottle. ("BPA" stands for bisphenol A, a problematic toxin that has often been added to polycarbonate plastics.)
100% fruit juices: Fruit juice can be healthy when it is 100% fruit juice, with no added sweeteners. But, keep in mind, that juice can pack a powerful punch in terms of calories and sugar, so it may not be wise to consume a lot of juice, even 100% fruit juice, if you are trying to drop a few pounds or have blood sugar regulation concerns. To take full advantage of the nutrients available in the fruit, press or juice the fruit at home, and consume it immediately. If you want to buy fruit juice at a grocery store, keep in mind that 100% fruit juice is harder to find than you might think as many fruit beverages sold in supermarkets contain only a small percentage (usually less than 10%) of actual fruit juice. For a special occasi on, instead of serving soda, make a refreshing and healthy punch by combining sparkling water with 100% cranberry juice, ice, and orange slices in a large bowl.
Iced herbal tea: Instead of regular iced tea, treat yourself to a cool drink of herbal iced tea. Many herbs are rich in powerful antioxidants, which support the immune system and overall health. Brew the tea stronger than you would if you were planning to serve the tea hot and then add ice and a sprig of mint or a slice of lemon. Peppermint tea is wonderful when served cold. Or, try a combination of various herbs: chamomile, hibiscus flower, lemon grass, orange peel, rose hips, and strawberry leaf.
Healthier Lifestyle Tea: Healthier Lifestyle Tea is the name I have given to a delicious and health-supporting beverage made of one cup of green tea and one teaspoon of lemon juice. Green tea is both delicious and renowned for its health-promoting properties. Many of its health benefits have been linked with the catechin phytonutrients, such as epigallocatechin-3-gallate (EGCG), that it contains. Catechins are antioxidants, which have heart-supportive and anti-cancer properties. The lemon juice adds a refreshing flavor to the tea and is experienced by many people as a perfect complement to the tea, which makes it especially satisfying. Healthier Lifestyle Tea can be enjoyed hot or iced. If you are sensitive to caffeine, you can make it with decaffeinated green tea.

How To Draw The Back Of The Human Hand Lesson

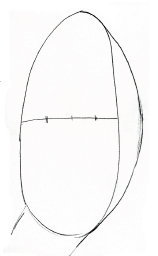
Begin with two shapes; the shape of the fingertips to the wrist
without the thumb and that same area with the thumb.
without the thumb and that same area with the thumb.
You should have a long, skinny oval for the first area and a lopsided egg shape for the second.
Divide
the oval in half and mark off four equally sized fingers. The guideline
for the thumb should extend out roughly the same distance as a quarter
of the oval, because the thumb and fingers are all about the same width
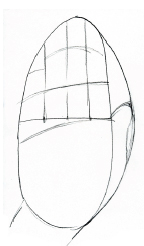
Extend
the fingers up from the hatch marks, keeping them parallel to the
thumb. The thumb begins to curve away from the hand at the horizontal
midline, curves in to form the tip, and then curves out at the knuckle.
The other knuckles should fall in an arc beginning at the right center
point and crossing downward. The second joint lies a third of the way up
the oval, and a third of the way up again marks the third line of
knuckles, with the exception of the pinky.
The pinky is so much shorter than the other fingers that the tip of the
pinky lines up with the top knuckle of the ring finger.
When
the guidelines are marked, sketch in rough circles at each knuckle,
then erase the guidelines and re-shape the fingers and outside of the
hand as needed.
The pinky cuts in from the side so that the outer shape of the hand
becomes more tapered and graceful. Each finger should taper up from the
base to the tip, and the thumb juts out at the bottom knuckle, then cuts
in sharply to the wrist.
When
the outer lines are finished, work on details. The base of each
fingernail lies halfway between the fingertip and first knuckle.
You may or may not see skin above the nail, but you should always see
skin around both sides of the fingernail unless the finger is tilted.
When the fingers are seen straight on, the thumb angles outward, so you will only be able to see a partial thumbnail.
The bottom knuckles can be indicated with skinny "V" lines, and the
other knuckles are three lines; one straight between two curves. The
knuckles shouldn't extend to the end of the finger
 Want To Learn More...
Learn how to draw realist hands in different positions and from different angles taught by a real professional artist.
Hand Mastery is generously illustrated showing you step-by-step how to draw hands that look realistic.
With clear (and fun) instructions on how to draw ... you'll learn at your own pace in the comfort of your home.
You
get high definition videos with simple and easy to follow written
instructions so you know exactly how to make your drawings jump off the
page.
Warm Regards
Chris Elmore
Drawing Made Easy
Chris Elmore
Drawing Made Easy


Curried Chicken Over Spinach - Healthy Food Tip and Recipe
Today's Recipe
If you don't know what to serve for dinner tonight ...
This is a great tasting dish that requires little work. The curry
coconut complements the flavor of spinach and you can easily include
more vegetables. Just increase the amount of sauce slightly and add
along with the bell peppers.
Curried Chicken Over Spinach

Prep and Cook Time: 30 minutes
Ingredients:
- 3 boneless, skinless chicken breasts cut into bite sized pieces (6oz each)
- 1 1/2 cup chicken stock
- 3 cloves garlic, sliced
- 1 TBS fresh ginger chopped, or 1/2 tsp dried
- 1/2 tsp turmeric
- 1 tsp curry powder
- 1 medium sized onion, cut in half and sliced
- 1 medium sized red bell pepper julienne about 1 inch long
- 1/2 cup coconut milk, make sure it is mixed well before using
- 4 bunches fresh spinach
- salt & white pepper to taste
- Bring water to a boil for spinach. While water is coming to a boil, cut chicken into bite sized pieces. Healthy Sauté onion in a medium sauté pan over medium low heat for about 5 minutes stirring frequently. Add garlic and fresh ginger and continue to sauté for another minute. Add turmeric, and curry and mix well. Add stock, chicken, and coconut milk. Simmer for 5 minutes and add bell peppers and other vegetables you desire. Cook until chicken is done, about another 5 minutes.
- While chicken is cooking, cut ends off the bunch of spinach all at once. Don't bother trying to do it one stem at a time. It will take you too long and it is not necessary. Rinse spinach well and drop into boiling water for just 1 minute. Strain and press dry. Season with salt and pepper.
- Place spinach on plates and top with chicken mixture.
45 Life Lessons, Written by a 90 Year Old (Craig Coppola)
Below
is a list of 45 life lessons written by a 90-year-old. While I see a
ton of these types of articles, I tend to always read them because I
find one or two nuggets of true wisdom every time. I have highlighted
my favorites below, but here are the three that hit me in this list:
--When in doubt, just take the next small step.
--Save for things that matter (click here see the LIFEies on buying experiences not things).
--Envy is a waste of time. Accept what you already have, not what you think you need.
AND a bonus tidbit---when it comes to chocolate, resistance is futile.
Happy Holidays,

P.S. I got a lot of positive feedback from the meditation article I sent last week. If you are interested, click here to watch a great 2 minute video from The Huffington Post on how exercise can redirect your brain toward happiness.
Rule #16 from my book The Fantastic Life: Don't Waste Time
This rule emphasizes focusing on the positives in your life, and not dwelling on the negatives. Life is too short to waste time.
45 Life Lessons, written by a 90 year old
1. Life isn’t fair, but it’s still good.
2. When in doubt, just take the next small step.
3. Life is too short not to enjoy it.
4. Your job won’t take care of you when you are sick. Your friends and family will.
5. Don’t buy stuff you don’t need.
6. You don’t have to win every argument. Stay true to yourself.
7. Cry with someone. It’s more healing than crying alone.
8. It’s OK to get angry with God. He can take it.
9. Save for things that matter.
10. When it comes to chocolate, resistance is futile.
11. Make peace with your past so it won’t screw up the present.
12. It’s OK to let your children see you cry.
13. Don’t compare your life to others. You have no idea what their journey is all about.
14. If a relationship has to be a secret, you shouldn’t be in it.
15. Everything can change in the blink of an eye… But don’t worry; God never blinks.
16. Take a deep breath. It calms the mind.
17. Get rid of anything that isn’t useful. Clutter weighs you down in many ways.
18. Whatever doesn’t kill you really does make you stronger.
19. It’s never too late to be happy. But it’s all up to you and no one else.
20. When it comes to going after what you love in life, don’t take no for an answer.
21. Burn the candles, use the nice sheets, wear the fancy lingerie. Don’t save it for a special occasion. Today is special.
22. Overprepare, then go with the flow.
23. Be eccentric now. Don’t wait for old age to wear purple.
24. The most important sex organ is the brain.
25. No one is in charge of your happiness but you.
26. Frame every so-called disaster with these words, ‘In five years, will this matter?’
27. Always choose Life.
28. Forgive but don’t forget.
29. What other people think of you is none of your business.
30. Time heals almost everything. Give Time time.
31. However good or bad a situation is, it will change.
32. Don’t take yourself so seriously. No one else does.
33. Believe in miracles.
34. God loves you because of who God is, not because of anything you did or didn’t do.
35. Don’t audit life. Show up and make the most of it now.
36. Growing old beats the alternative — dying young.
37. Your children get only one childhood.
38. All that truly matters in the end is that you loved.
39. Get outside every day. Miracles are waiting everywhere.
40. If we all threw our problems in a pile and saw everyone else’s, we’d
grab ours back.
41. Envy is a waste of time. Accept what you already have, not what you think you need.
42. The best is yet to come…
43. No matter how you feel, get up, dress up and show up.
44. Yield.
45. Life isn’t tied with a bow, but it’s still a gift.
--When in doubt, just take the next small step.
--Save for things that matter (click here see the LIFEies on buying experiences not things).
--Envy is a waste of time. Accept what you already have, not what you think you need.
AND a bonus tidbit---when it comes to chocolate, resistance is futile.
Happy Holidays,
P.S. I got a lot of positive feedback from the meditation article I sent last week. If you are interested, click here to watch a great 2 minute video from The Huffington Post on how exercise can redirect your brain toward happiness.
Rule #16 from my book The Fantastic Life: Don't Waste Time
This rule emphasizes focusing on the positives in your life, and not dwelling on the negatives. Life is too short to waste time.
45 Life Lessons, written by a 90 year old
1. Life isn’t fair, but it’s still good.
2. When in doubt, just take the next small step.
3. Life is too short not to enjoy it.
4. Your job won’t take care of you when you are sick. Your friends and family will.
5. Don’t buy stuff you don’t need.
6. You don’t have to win every argument. Stay true to yourself.
7. Cry with someone. It’s more healing than crying alone.
8. It’s OK to get angry with God. He can take it.
9. Save for things that matter.
10. When it comes to chocolate, resistance is futile.
11. Make peace with your past so it won’t screw up the present.
12. It’s OK to let your children see you cry.
13. Don’t compare your life to others. You have no idea what their journey is all about.
14. If a relationship has to be a secret, you shouldn’t be in it.
15. Everything can change in the blink of an eye… But don’t worry; God never blinks.
16. Take a deep breath. It calms the mind.
17. Get rid of anything that isn’t useful. Clutter weighs you down in many ways.
18. Whatever doesn’t kill you really does make you stronger.
19. It’s never too late to be happy. But it’s all up to you and no one else.
20. When it comes to going after what you love in life, don’t take no for an answer.
21. Burn the candles, use the nice sheets, wear the fancy lingerie. Don’t save it for a special occasion. Today is special.
22. Overprepare, then go with the flow.
23. Be eccentric now. Don’t wait for old age to wear purple.
24. The most important sex organ is the brain.
25. No one is in charge of your happiness but you.
26. Frame every so-called disaster with these words, ‘In five years, will this matter?’
27. Always choose Life.
28. Forgive but don’t forget.
29. What other people think of you is none of your business.
30. Time heals almost everything. Give Time time.
31. However good or bad a situation is, it will change.
32. Don’t take yourself so seriously. No one else does.
33. Believe in miracles.
34. God loves you because of who God is, not because of anything you did or didn’t do.
35. Don’t audit life. Show up and make the most of it now.
36. Growing old beats the alternative — dying young.
37. Your children get only one childhood.
38. All that truly matters in the end is that you loved.
39. Get outside every day. Miracles are waiting everywhere.
40. If we all threw our problems in a pile and saw everyone else’s, we’d
grab ours back.
41. Envy is a waste of time. Accept what you already have, not what you think you need.
42. The best is yet to come…
43. No matter how you feel, get up, dress up and show up.
44. Yield.
45. Life isn’t tied with a bow, but it’s still a gift.

Saturday, December 27, 2014

Wednesday, December 24, 2014

Tuesday, December 23, 2014

Monday, December 22, 2014
A Quote by Dr John Demartini


Sunday, December 21, 2014


How To Use Diagonals To Find Depth

The techniques of perspective drawing are based on principles of simple geometry.
For instance, you can find the center, or midpoint, of any square or rectangle by drawing the diagonals of that shape.
The center is the point where the two lines intersect.
Knowing that, you can quickly find the center of rectangles and squares no matter how they're angled.
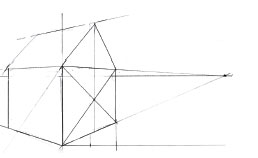
This is very helpful in putting a roof on a house, for instance, since
you know that the roof usually peaks directly over the center of one
side of the house.
Find the center of that side using diagonals, draw a vertical guideline
straight up from it, and choose a point on that line to be your roof
height.
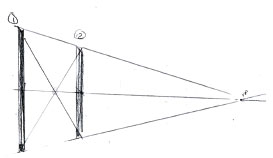
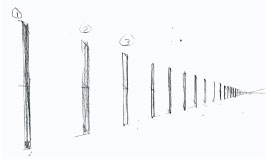
Diagonals also allow the artist to quickly determine where to place a row of retreating objects or lines.
Simply place the first two objects the distance apart that you want the
rest to be, draw the diagonals to find the midpoint, and draw that
midpoint through the vanishing point on the horizon line.
Now you've found the midpoint for every shape retreating on that plane.
To
place the next object in line equidistant from the first two, draw a
line through the top of the first post through the midpoint of the
second post, all the way to the vanishing line.
Where the line intersects the vanishing line is the beginning of the
third post, which you can draw to its height on the upper vanishing line
using a triangle.
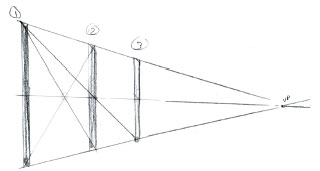
Continue this process until all of the posts are placed, then erase the guidelines to finish.
 Want To Learn More...
Perspective is the set of techniques that anyone involved in
representational drawing uses to transpose a 3D scene onto a 2D format.
Or in simple words, it's how you make your drawings look real!
You have to study it and know the principles if you have any chance at all of bringing our drawings to life.
Learning perspective is a fundamental element that you need to master before you can draw like a true professional.
The good news is that Perspective Mastery is generously illustrated
showing you step-by-step how to make your drawings come to life.
With clear (and fun) instructions on how to draw ... you'll learn at your own pace in the comfort of your home.
Warm Regards
Chris Elmore
Drawing Made Easy
Chris Elmore
Drawing Made Easy


How To Use Boxes to Simplify Shapes

Once you can draw a box in one, two, and three point perspective ...
... you can draw most anything, because any three dimensional object will have a top, bottom, and sides.
Therefore,
even if it doesn't look like a box, it can be put into a box and the
rules of foreshortening and convergence will still apply.
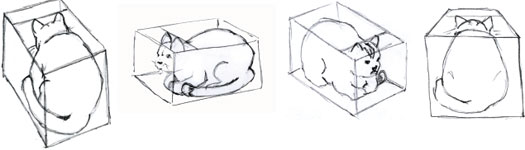
For example, try drawing boxes at several different angles and points of view.
Now
draw a cat in each box. The cat is in no way flat on the sides like a
box, yet having the box drawn is a definite help because the box gives
you a sense of space in the picture plane, and the height and width
dimensions act as guidelines for the back, head, body and legs.
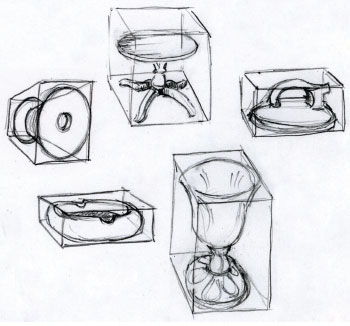
Try
this activity with several non-box objects, as well as with those
countless objects that are, roughly or precisely, squares or rectangles.
Even round objects can be put into boxes, which is very helpful to
remember as you practice drawing circles, spheres, and cones.
 Want To Learn More...
Perspective is the set of techniques that anyone involved in
representational drawing uses to transpose a 3D scene onto a 2D format.
Or in simple words, it's how you make your drawings look real!
You have to study it and know the principles if you have any chance at all of bringing our drawings to life.
Learning perspective is a fundamental element that you need to master before you can draw like a true professional.
The good news is that Perspective Mastery is generously illustrated
showing you step-by-step how to make your drawings come to life.
With clear (and fun) instructions on how to draw ... you'll learn at your own pace in the comfort of your home.
Warm Regards
Chris Elmore
Drawing Made Easy
Chris Elmore
Drawing Made Easy

10 Ways to Cut 100 Calories article
Cut Calories to Avoid Gaining Weight
-
 While healthy food choices are key, it’s also
important to eat the right amount of food. Cutting calories is one easy
way to stop weight
gain. Eating an extra 100 calories a day can cause you to gain 10
pounds a year, whereas eating 100 calories less than usual may result in
a loss of 10 pounds. Here are 10 simple ways to reduce calories and
still enjoy eating.
While healthy food choices are key, it’s also
important to eat the right amount of food. Cutting calories is one easy
way to stop weight
gain. Eating an extra 100 calories a day can cause you to gain 10
pounds a year, whereas eating 100 calories less than usual may result in
a loss of 10 pounds. Here are 10 simple ways to reduce calories and
still enjoy eating.
Click here to the the 10 simple ways to cut calories


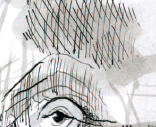
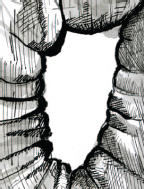
How To Draw Rough Skin Using Pen And Ink Lesson

Pen and ink is an excellent medium for depicting animals with a lot of linear qualities, like long fur or wrinkled skin.
You can use dip pens to build up tone using line techniques, or you can paint in tone with brushes.
Before beginning a finished work, practice the different strokes that you'll need to be comfortable with.

Hatching is making a series of parallel lines to develop tone. Thicker lines produce
darker tone than thin lines, and the closer the lines are together, the darker the
tone will appear.
darker tone than thin lines, and the closer the lines are together, the darker the
tone will appear.
Crosshatching
is crossing a set of hatched lines with another set of lines
perpendicular to the first. The more passes you make, the darker the
tone will become.

You'll also want to practice making lines that are thick and thin,
... broken,
... and grass strokes.
When you're comfortable with the different strokes, you can begin adding ink to a pencil sketch.
Begin by outlining the most important exterior lines, using the broken
line technique to make sure the animal doesn't look outlined. Erase the
pencil lines, then add interior line to develop the shapes of legs,
trunk, ears, and the eye.
Begin to develop tone by hatching, then cross hatch to darken the darkest areas.
Outline the shapes of shadows first, and then fill them in with hatched lines.
When the line work is done, you may decide to thicken some of the lines with a brush.
If you do, make sure that you use the technique in more than one or two spots on the picture, or they'll look like mistakes.
You
can also use diluted ink to paint in washes of tone if desired. The ink
dries quickly, so to make even washes, work quickly and with the
largest brush possible. When the washes are dry, you can go back over
the top with more line or tone.

 Want To Learn More...
Animal Mastery is what you need to successfully learn to draw your favorite animals.
We give you clear videos showing you step-by-step how to draw animals.
With clear (and fun) instructions on how to draw ... you'll learn at your own pace in the comfort of your home.
The artist has chosen popular animal pictures and will show you how to draw each one in color.
Each image has high definition videos outlining the animal in pencil and adding color to the image.
Warm Regards
Chris Elmore
Drawing Made Easy
Chris Elmore
Drawing Made Easy
Subscribe to:
Posts (Atom)
-
 "An unwritten want is a wish, a dream, a never-happen. The day you put your goal in writing is the day it becomes a commitment that wil...
 -
 Having als is no fun. It is a very hard illness to accept. Nothing prepares you for it. Been diagnosed with it almost a year and half ag...