
Wednesday, November 26, 2014
Happy Thanksgiving
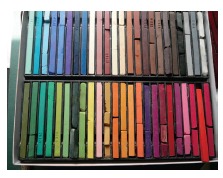
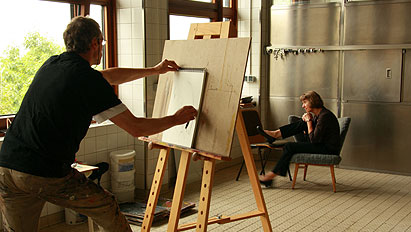
How To Choose The Right Pastels For A Great Landscape Image Lesson

Pastels are a wonderful, vibrant medium to work with.
Because they don't require drying time, the mark you put down is the mark you end up with ...
... which can alleviate a lot of frustration and save time.
Furthermore, because there is no liquid binder in pastels, they do no degrade over time but are highly archival.
There are many different brands and types of pastel available on the
market, and since pastels can be quite expensive, it's important to know
what you want from the medium before you go shopping. An overview of
the types of pastels is therefore very helpful.
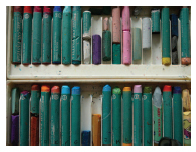
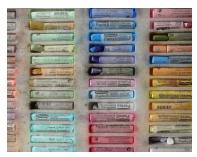
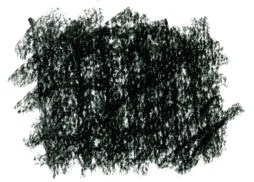
Pastel sticks are either soft or hard. Soft pastels contain less binder and more pigment than hard pastels.
They are easily blended and put down rich, vibrant color. They are also
more easily broken, raise more dust than hard pastels, and just as they
blend more easily, they also smudge more easily.
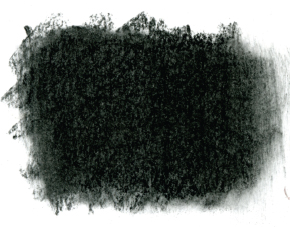
Hard Pastels, such as NuPastel sticks, have less pigment and more binder, and so produce line quality that is crisp and sharp.
For
this reason, hard pastel sticks are better for preliminary sketches and
finishing details, while soft pastels are best used to build up intense
blocks of color and marking highlights.
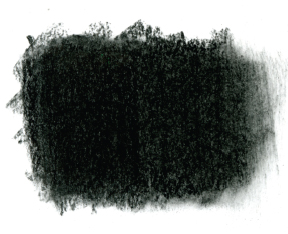
Pastel
Pencils are pencils with a hard pastel core. They can be sharpened,
blended, and erased like a charcoal pencil and not surprisingly, are
best suited for line work, sketches, and fine details.
 Want To Learn More...
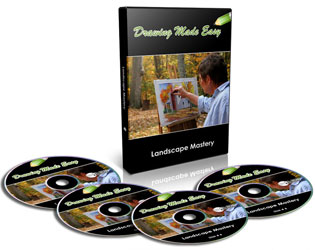
Landscape Mastery is generously illustrated showing you step-by-step how to draw landscapes.
With clear (and fun) instructions on how to draw, you'll learn at your own pace in the comfort of your home.
The artist has chosen popular landscape pictures and will show you how to draw each one in color.
Landscape
drawing is a fascinating area of study which requires an understanding
of perspective, light and shade, detail and abstraction.
Warm Regards,

Chris Elmore
Drawing Made Easy
Chris Elmore
Drawing Made Easy

Turkey and Vegetable Chili Verde - Healthy Food Tip and Recipe
healthy food tip and recipe
Today's Recipe
If you don't know what to serve for dinner tonight ...
Cruciferous vegetables, like kale, are some of the most health-promoting vegetables around. This kale and turkey combination makes for a unique version of chili that is sure to become one of your favorite Healthiest Way of Eating recipes.

Ingredients:
- 1 medium onion, chopped
- 3 medium cloves garlic, chopped
- 1 lb ground turkey
- 1 4 oz can diced green chili
- 1 15 oz can of diced tomatoes
- 1 TBS + 4 cups chicken broth
- 4 cups finely chopped kale
- 2 cups or 1 15 oz can (BPA-free) pinto beans, drained and rinsed
- 2 TBS chopped fresh oregano
- 3 TBS chopped fresh cilantro
- salt and black pepper to taste
- Chop garlic and onion and let sit for at least 5 minutes to enhance their health-promoting benefits.
- Heat 1 TBS broth in a medium soup pot. Healthy Sauté onion in broth for 5 minutes over medium heat, stirring frequently. Add garlic and ground turkey with a pinch of salt and pepper. Continue to sauté, breaking up turkey for another 5 minutes.
- Add diced tomatoes, chili, and broth to turkey mixture and bring to a boil on high heat. Stir in chopped kale, reduce heat to medium, and simmer for another 10 minutes.
- Add beans, simmer for another several minutes and add herbs, salt, and pepper.
In-Depth Nutritional Profile for Turkey and Vegetable Chili Verde
Healthy Food Tip
I just purchased quinoa for the first time and now I am not sure what to do with it. Can you give me some ideas as to how I can prepare it?
One of my favorite ways to prepare quinoa is as a breakfast cereal. To make a pot of quinoa, I usually use a ratio of two parts water to every one part quinoa. For example, I add one cup of cold water to ½ cup quinoa and cook for about 10-15 minutes. After it is done, keeping the burner at low temperature, I mix in some soymilk (but you can use any type of regular milk or milk alternative if you prefer) to give it an oatmeal-like, moist texture. Then I add in chopped nuts and dried fruits. Sometimes, I'll also add in a little natural sweetener like honey, maple syrup, or agave syrup. When I'm in the mood for a little extra creaminess, I'll add in a little coconut milk as well.
As a side dish, I'd recommend using quinoa like you would use rice. You can either serve it plain or add some seasonings, vegetables, and/or nuts.
Quinoa also makes a great base for cold grain salads. One of my favorites is making quinoa tabouli. To do so, I add some chopped greens (like parsley, mint, and/or scallions) to chilled cooked quinoa. Then I add some extra virgin olive oil, lemon juice, and salt and pepper to taste. Oftentimes, I'll also add other ingredients for variety; for example, adding some chopped nuts and feta cheese is one of my favorite ways to add extra zing to a cold quinoa salad.
Regardless of how you prepare your quinoa, remember to wash it well before cooking it. Raw quinoa is coated with naturally occurring saponins that can impart a soapy taste to your otherwise delicious quinoa if not removed. An easy way to wash the quinoa is to run cold water over quinoa that has been placed in a fine-meshed strainer, gently rubbing the seeds (quinoa is technically a seed, not a grain) together with your hands. To ensure that the saponins have been completely removed, taste a few seeds. If they still have a bitter taste, continue the rinsing process.
For more information on this topic, please see:

How to Cut Calories at Thanksgiving Dinner

Save 1,273 calories and 92 grams of fat over the traditional version with this healthy Thanksgiving dinner makeover.
With all the great Thanksgiving dishes to taste, chances are you’ll eat far more calories on Turkey Day than you would at a typical dinner. But if you just have a light breakfast and lunch or snack, our version of the big meal, which has less than half the calories and a quarter of the fat of a traditional Thanksgiving meal, can easily fit into a healthy 1,500- to 2,000-calorie day. With a few simple changes to the classic Thanksgiving menu, our healthy Thanksgiving menu – which still includes turkey, gravy, stuffing, sweet potatoes, onions, green beans and pumpkin pie – saves 1,273 calories and 92 grams of fat over the traditional version. Here’s how it compares to a menu with traditional versions of these dishes. Download a FREE Thanksgiving Dinner Menu & Shopping List!| EatingWell Meal | Traditional Meal | Amount Saved | % Cut | |
|---|---|---|---|---|
| Calories | 1,061 | 2,334 | 1,273 | 55% |
| Fat (g) | 35 | 127 | 92 | 72% |
| Saturated Fat (g) | 9 | 68 | 59 | 87% |
| Sodium (mg) | 1,580 | 3,227 | 1,647 | 51% |
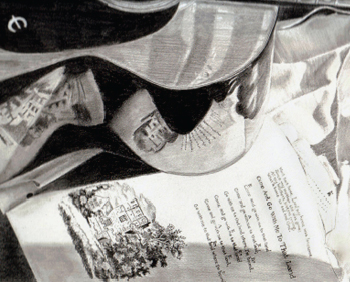
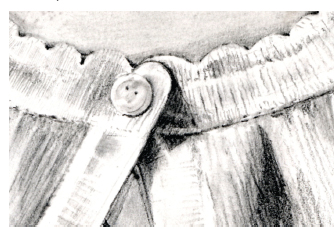
How To Improve Your Realistic Portraits With Extra 'Props' For Enhancement Lesson

Drawing people accurately is obviously necessary in making successful family portraits ...
... but you can add depth and interest to the picture by also adding props.
Objects
that help to tell a story, give a sense of the family's personality,
and help connect the viewer to the people in the picture.
Some common examples are families reading together, playing a game, or playing an instrument.
When drawing a prop, you're usually drawing a man-made object with perfectly straight lines, curves, or angles.
Often
there is lettering to contend with as well, or complex symbols. The
best way to handle it, therefore, is to keep the form simple to begin
with and not to get caught up in the details until it's time to put them
in.
1.
Draw the large shape of the object in sketchy lines to check placement
on the page. Make sure that the size of the object is proportional to
the people by marking off lines for the width and height before you do
more careful rendering.
2.
When you're sure that the object is sized, placed, and angled on the
page correctly, begin to darken the outline. For straight edges, always
use a ruler even if the line is small.
For precise curves or circles, use a flexible curve, french curve, or
other template. At this point you're still concentrating on the shape of
the object, nothing more complex than that.
3.
Begin sketching guidelines for the interior shapes and designs. Sketch
lightly, and then clean up and make modifications just as you did with
the large exterior shape.
If there are extreme contrasts around a clean shape (such as the "E" on
the guitar pictured here), mask the shape with frisket film before you
lay down any tone.
4. Add tone to the object, first in the mid-tones and highlights leaving darks for last whenever possible to minimize smudging.
Detail
work such as picking out wood grain in the guitar, or creases in the
old books, can be done by alternating between pencil work and erasing
out lines, and you can use the indentation technique for small white
lines and letters.
 Want To Learn More...
Learn how to draw portraits like a master with our latest portrait mastery drawing course.
It's just like having your own drawing teacher guide you step-by-step along the way without the expensive price tag.
No more smudgy mess with black and white that looks like a first grader whipped up in art class.
"Portrait Mastery" is generously illustrated showing you step-by-step just how to create a real life portrait.
Warm Regards
Chris Elmore
Drawing Made Easy
Chris Elmore
Drawing Made Easy
Herb-Roasted Turkey and Vegetables

Ingredients
- 2 tablespoons snipped fresh parsley
- 4 cloves garlic, minced
- 1 teaspoon snipped fresh rosemary
- 1 teaspoon snipped fresh thyme
- 1/2 teaspoon salt
- 1/2 teaspoon ground black pepper
- 1 2 3/4 - 3 1/4 - pound turkey breast portion with bone, skin removed
- Nonstick cooking spray
- 3 cups tiny red potatoes, quartered (about 1 pound)
- 2 cups baby carrots with tops trimmed and halved lengthwise (about 8 ounces)
- 2 cups white and/or red pearl onions trimmed and halved (about 8 ounces)
- 1 tablespoon olive oil
Directions
- Preheat oven to 400 degrees F. In a small bowl, combine parsley, garlic, rosemary, thyme, salt, and pepper. Set aside 1 tablespoon of the herb mixture.
- Place turkey breast portion, bone side down, on a roasting rack in a shallow roasting pan. Lightly coat with nonstick cooking spray. Sprinkle the remaining herb mixture evenly over turkey breast portion; rub in with your fingers. Roast, uncovered, for 20 minutes.
- Meanwhile, in a large bowl, combine potatoes, carrots, and pearl onions; add the reserved 1 tablespoon herb mixture and the olive oil and toss until vegetables are coated. Arrange vegetables around turkey in roasting pan.
- Reduce oven temperature to 350 degrees F. Roast for 1-1/4 to 1-1/2 hours more or until juices run clear, turkey is no longer pink (170 degrees F), and vegetables are tender, stirring vegetables once.
- Transfer turkey to cutting board; tent with foil and let stand for 10 minutes before carving. Trim meat from bone. Reserve and store* 10 ounces of the turkey (about 2 cups) and 2 cups of the vegetables for the Turkey and Bean Soup. Serve the remaining turkey with the remaining vegetables. Makes 4 servings, plus enough reserved turkey and vegetables for Turkey and Bean Soup
Storage
- * Place the reserved cooked turkey and vegetables in an airtight container. Cover and store in the refrigerator for up to 2 days or freeze for up to 3 months.
Nutrition Facts Per Serving:
Servings Per Recipe: 4PER SERVING: 231 cal., 3 g total fat (1 g sat. fat), 69 mg chol., 219 mg sodium, 21 g carb. (3 g fiber), 30 g pro.

Breakfast Calories Key to Total Intake, Study Finds by Annie Hauser, Senior Editor
Breakfast might be the most important meal of the day because it sets the course for your day's eating habits, new research says.

Researchers at the Technical University of Munich set out to determine how a large breakfast impacts your diet for the rest of the day. Their conclusion, published in the Nutrition Journal, is that a large breakfast almost always means a higher total daily calorie intake in both obese and normal-weight participants, which is slightly contrary to general wisdom. A landmark study published in the American Journal of Epidemiology in 2008 found that eating more calories at breakfast and fewer later in the day helped reduce weight gain in adults. According to the National Weight Control Registry, eating breakfast is one of the behaviors most solidly associated with long-term weight management in formerly overweight adults. This time around, researchers recommended that dieters indeed should eat breakfast, but that they should limit themselves to smaller breakfasts to help reduce total calorie intake during the day.
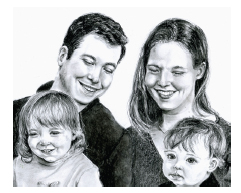
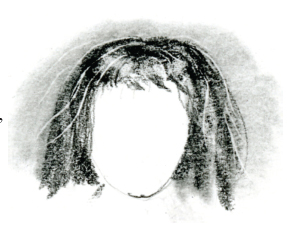
How To Improve Your Realistic Portraits By Rendering Hair For Different Ages Lesson

Hair is generally more coarse in adults, finer and softer for children and babies.
When you're drawing a family portrait, it's important to be able to realistically show a difference ...
... because often times a wide age range is represented in the family.
-
No matter whose hair you're drawing, begin with some lines that clarify
the shape of the head, the outer shape of the hairstyle, and some of
the interior lines.
You should have a clear idea of where the hair parts, how it falls around the face, where it ends and how far out it extends as well as where the highlights and large shadow shapes are.
-
Indent a few highlight hairs by pressing into the white paper with a blunt stylus or a sharp graphite pencil over a piece of tracing paper. These will remain white even after going over the top with heavy charcoal.

- Build
up tone in the hair using charcoal pencil. Work lightly; you're not
drawing individual strands of hair so much as getting tone on the hair
in the shapes of shadows and avoiding the highlights.
For young kids and babies, do most of this work with soft graphite, which has a finer texture than charcoal.

-
Blend over the body of the hair with a tortillon. In adults, blend
less, letting more of the coarse texture remain. In children and babies,
blend the tone more.

- Go
back into the body of the hair and emphasize dark strands with the
charcoal or graphite (charcoal for adults, graphite for children).
Pull out highlights with a kneaded eraser and make some flyaway hairs on the outside of the of the hair and around the face.
Want To Learn More...
Learn how to draw portraits like a master with our latest portrait mastery drawing course.
It's just like having your own drawing teacher guide you step-by-step along the way without the expensive price tag.
No more smudgy mess with black and white that looks like a first grader whipped up in art class.
"Portrait Mastery" is generously illustrated showing you step-by-step just how to create a real life portrait.
Warm Regards
Chris Elmore
Drawing Made Easy
Chris Elmore
Drawing Made Easy
5 Holiday Drinks That Can Pack on the Pounds by Stephanie Sy, Everyday Health Staff Writer
Nutritionists say the popular warm coffee drinks of the season can pack on pounds.

Nutritionist Laura Jeffers at Cleveland Clinic says it's easy to lose track of the number of calories in cozy holiday drinks like eggnog lattes, but they add up fast. "The more flavors and names that you have with that drink, the more calories you're going to have," Jeffers says.
When it comes to some holiday drinks, modifications can help cut down on calories. Jeffers recommends replacing whole milk with skim milk and trying sugar-free syrups in caffe lattes for a taste of the season without the calories.
CLICK HERE TO READ FURTHER THIS ARTICLE

Wednesday, November 19, 2014
Go Gluten-Free With Elisabeth Hasselbeck
'The View' co-host Elisabeth Hasselbeck shares tips for boosting your energy levels and choosing deliciously healthy foods in her book, 'The G-Free Diet: A Gluten-Free Survival Guide'.
Related
Lose Weight by Lowering Carbs
30-Minute Dishes for Every Weeknight
More in Diet & Nutrition
Gluten-free diets are all the rage these days as way to lose weight, but the trend has its roots in a very serious and debilitating health condition: celiac disease. Putting a name and face to this often misunderstood disease is Elisabeth Hasselbeck, co-host of the ABC morning talk show The View, New York Times bestselling author, clothing designer (for Dialogue by Elisabeth Hasselbeck), wife of NFL commentator Tim Hasselbeck, and mother of three. When Hasselbeck wrote The G-Free Diet: A Gluten-Free Survival Guide, she shared her journey from mysterious symptoms and embarrassment to an accurate diagnosis and lifestyle changes that have left her looking and feeling better than ever.
Hasselbeck recently talked to Everyday Health about the differences going gluten-free has made on her body, mind, and spirit.
Click here to read further

How To Improve Your Realistic Portraits Using Light And Dark Contrasts Lesson
It is often necessary to build up large black areas in pencil drawings, either for backgrounds or clothing.
If you try to make blacks by using soft graphite pencil and "scrubbing" the paper ...
... the result will be uneven and shiny rather than a flat black.
Using a charcoal pencil is an improvement, but it will still be an extremely painstaking, laborious process.
The best solution is to branch out and use a combination of willow
charcoal, charcoal pencil, and sometimes graphite pencil last of all.
Begin by flattening the edge of a stick of willow charcoal against the
sandpaper block to give yourself the largest surface area you can.
Cross-hatch strokes of willow charcoal until the entire dark area is
covered. Because willow charcoal is so soft, it will be helpful to
protect any edges you wish to remain white before you begin.
Blend
the willow charcoal smooth with a chamois or stomp,and go back into the
area with a stick of harder charcoal that has once again been flattened
on one side with sandpaper.
If the area is small enough, you can use a charcoal pencil instead,
laying down tone in smooth strokes or small circles. Blend this layer as
well.
For the smoothest finish, blend first with a tortillon and then with felt.
Depending
on the texture you're trying to achieve, you may want to go over the
charcoal layer a third time with graphite, which will fill in the tooth
of the paper even more. It will also give the area a silvery sheen which
may or may not be desireable.
 Want To Learn More...
Learn how to draw portraits like a master with our latest portrait mastery drawing course.
It's just like having your own drawing teacher guide you step-by-step along the way without the expensive price tag.
No more smudgy mess with black and white that looks like a first grader whipped up in art class.
"Portrait Mastery" is generously illustrated showing you step-by-step just how to create a real life portrait.
Warm Regards
Chris Elmore
Drawing Made Easy
Chris Elmore
Drawing Made Easy
Monday, November 17, 2014

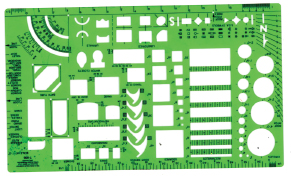
Using Templates In Your Portrait Drawings To Increase Realism

Templates are available in a huge range of shapes and sizes ...
... and if you want realism in your
drawings, you'll need to invest in some.
drawings, you'll need to invest in some.
Start with a set of circles, ovals, and squares, but it's a good idea
to look over the options to keep in mind for future projects.
Templates are necessary because even when drawing portraits, you are
often required to depict man-made objects-- buttons, patterns on
clothing, buckles, and zippers are a few of the most common.
Keep
in mind when you're using templates that shapes are only perfect from
head-on angles. The shapes need to be adjusted for side views, bird's
eye and worm's eye vantage points.
Because of that, in addition to having shapes, you also need templates
of curves that you can use to render perfect lines that are angled.
French curves are a good option for small areas, and a flexible curve is
good for large ones.
When
using a template on your drawing, check to be sure that it's clean
before putting it on the down (sounds obvious, but that has been a
lesson hard learned in my case).
Draw
the shape in place lightly, remove the template and double check that
it's the right size and in the right place before re-tracing over it
darker. Vary the pressure of the line as you trace; unless it's a
pattern on cloth, it will have a dark side and a highlight side.
Emphasize
the difference even if it's not visible in the picture; the
exaggeration will heighten realism in your work. If there are lines
within lines, don't get lazy and try to freehand them ... they'll appear
sloppy so close to the precise lines.
If
the shape has tone (versus being an outline), fill it in and blend over
the top with the template still in place. It's faster, and it looks
better because it hides your pencil strokes.
 Want To Learn More...
Learn how to draw portraits like a master with our latest portrait mastery drawing course.
It's just like having your own drawing teacher guide you step-by-step along the way without the expensive price tag.
No more smudgy mess with black and white that looks like a first grader whipped up in art class.
"Portrait Mastery" is generously illustrated showing you step-by-step just how to create a real life portrait.
Warm Regards
Chris Elmore
Drawing Made Easy
Chris Elmore
Drawing Made Easy
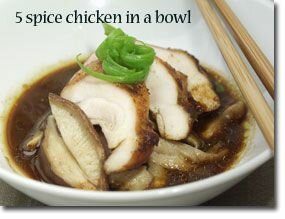
5-Spice Chicken in a Bowl - Healthy Food Tip and Recipe
healthy food tip and recipe
Today's Recipe
If you don't know what to serve for dinner tonight ...
The unique use of spices in the broth combined with the chicken gives you a great combination of flavors in this easy-to-prepare addition to your Healthiest Way of Eating. Not only does it taste great you will also receive 155% of the daily value (DV) for health-promoting vitamin K, 68% DV for protein, and 67% DV for niacin. Enjoy!
Ingredients:
- 2 boneless, skinless chicken breasts (6 oz each), cut in 2-inch pieces
- 4 cups chicken broth
- 1/2 inch sliced fresh ginger, sliced (or 1/2 tsp dried ginger)
- 6 whole cloves
- 2 cinnamon sticks
- 5 star anise
- 1/2 tsp dried fennel seeds
- 1 medium-sized onion, chopped in big pieces
- 3 cloves garlic, chopped in big pieces
- 6 whole medium dried shiitake mushrooms
- 1 lb green beans, ends cut off
- 1/2 cup minced scallions
- Chop onion and garlic and let sit for 5 minutes to bring out their hidden health-promoting benefits.
- Healthy Sauté onion in a medium saucepan over medium-low heat for about 5 minutes, stirring frequently. Add garlic and continue to saut� for another minute. Add chicken broth, ginger, cloves, cinnamon stick, star anise, fennel seeds, and shiitake mushrooms. Turn heat to medium-high and simmer for 15 minutes.
- While broth is simmering, cut ends off beans and cut into 1-inch pieces.
- Strain broth mixture (saving shiitake mushrooms) and put liquid back into pan. Bring to a boil and simmer on high heat with chicken pieces and green beans. You may need to skim the surface a little while chicken pieces are cooking. Slice shiitake mushrooms and add to chicken and broth. Add scallion as well as salt and pepper to taste.
- Napa Cabbage Salad
In-Depth Nutritional Profile for 5-Spice Chicken in a Bowl
Healthy Food Tip
What is the difference between different types of peppers?
All peppers, including green chili peppers, belong to the
Capsicum genus of foods, and this food group has been extensively
studied with respect to health. We include three of the most widely
available and commonly consumed Capsicum peppers on our website and The
World's Healthiest Foods book: bell peppers, cayenne peppers, and chili
peppers. But there are many other peppers with similar properties,
including tabasco peppers, jalapeno peppers, and hot cherry peppers, as
well as other sweet peppers in addition to bell peppers.
Although it might seem like the biggest differences in peppers would be related to their size or shape, peppers can be nutritionally different for a wide variety of reasons. For example, if the growing season for a pepper has been cool and rainy, the pepper can accumulate more beta-carotene but less red-colored xanthophyll pigments. This trade-off isn't bad or good; it just gives you a different combination of healthy nutrients. Most peppers will also appear green when they are not fully ripened because their high chlorophyll content (making them look green to the eye) will overshadow their carotenoid content (which will make them look orange or yellow). If allowed to ripen more fully, these same green peppers will change in color to show more of their yellow-red carotenoid pigments. You'll get wonderful benefits from all of the peppers mentioned above, just different nutrient combinations.
If you are looking for particular nutrient benefits, you can use the following color-nutrient combinations as a general rule of thumb. Yellow peppers typically contain more of the lutein and zeaxanthin carotenoids. Red peppers usually have more lycopene and astaxanthin, two other important carotenoids. Orange peppers tend to offer more alpha-, beta-, and gamma-carotene, while purple peppers will usually provide you with more anthocyanin flavonoids. Since all of these nutrients can make important contributions to your health, I recommend a variety of peppers for the widest possible health support.
There is one group of individuals who may want to decide about peppers a little differently. The family of foods to which all Capsicum peppers belong is the nightshade family (Solanaceae). Nightshades also include tomatoes, eggplant, and potatoes. Nightshades contain substances called alkaloids that can be problematic in the diets of some individuals. In general, those with health problems involving their joints, including osteoarthritis, rheumatoid arthritis, and gout may be more sensitive to the effects of nightshade alkaloids and may need to reduce or eliminate these foods in their diet. All peppers would be included in this list of nightshade foods.
Mental Cleanse Call Recordings - Chapter 9

The recorded audio for the 3 PM ET call:
http://mffaudios.com/audios/2014-11-12-3PM.htm

The recorded audio for the 8 PM ET call:
http://mffaudios.com/audios/2014-11-12-8PM.htm

Now we move onto Chapter 10.

NOTE: We will be purging our member database this weekend
to cut down on our server mailing resources.

If You have NEVER posted a Lesson AND have not logged into
the Forum in the past 60 days, then Your account will be removed.

To stop receiving these notices, click on the Profile tab
after You log into the Forum, and Delete Your Account.
You can always read everything as a Guest.

To unsubscribe from these announcements, login to the forum and uncheck "Receive
forum announcements and important notifications by email." in your profile.

You can view the full announcement by following this link:

http://30daymentalcleanse.info/index.php?topic=12852.0

Regards,
The 30-Day Mental Cleanse Team.
Friday, November 14, 2014
Using 'White Line' Detail To Improve Your Realistic Portraits Lesson
Often times in drawings, there are white lines that are very fine sitting against a dark background.
Some examples are flyaway hairs, stiches in cloth, lettering, highlights in the eye, or texture in fabrics.
These
lines pose a difficult problem because they're too small to be
effectively picked out with an eraser after laying in tone, avoided with
pencil as you work in the rest of the picture, or masked with frisket.
The best bet in such cases is to use the indentation technique. The
area that you're indenting should be white, so clean it up before you
start.
Also, this technique works best when the drawing surface is firm but
padded, so stack loose paper or foam core board beneath your drawing.
Lay a piece of tracing paper over your drawing so you can see what
you're doing, and then, using a hard, sharp graphite pencil (5H or
harder), draw the lines that you want to keep white. This will take firm
pressure, so be careful not to tear the paper.
Remove
the tracing paper and shade over the indented lines. The charcoal or
graphite should skip right over the lines, leaving them white. If you
made a mistake and need to fill in the line, however, you can do so with
a sharp pencil and a blending stomp or tortillon.
 Want To Learn More...
Learn how to draw portraits like a master with our latest portrait mastery drawing course.
It's just like having your own drawing teacher guide you step-by-step along the way without the expensive price tag.
No more smudgy mess with black and white that looks like a first grader whipped up in art class.
"Portrait Mastery" is generously illustrated showing you step-by-step just how to create a real life portrait.
Warm Regards
Chris Elmore
Drawing Made Easy
Chris Elmore
Drawing Made Easy

Subscribe to:
Posts (Atom)
WILL YOU HELP OUT A FRIEND IN DIRE NEDD??
HE LOST HIS JOB AND MEDICAL COVERAGE UNFORTUNATELY 😣😣 AND HE HAS CANCER. RICHARD AND HIS WIFE EXPERIENCING FINANCIAL DIFFICULTIES. ...

-
 HE LOST HIS JOB AND MEDICAL COVERAGE UNFORTUNATELY 😣😣 AND HE HAS CANCER. RICHARD AND HIS WIFE EXPERIENCING FINANCIAL DIFFICULTIES. ...
