Monday, September 29, 2014
Sunday, September 28, 2014
Lesson: How To Draw Hair & How To Draw Arms
How To Draw Hair
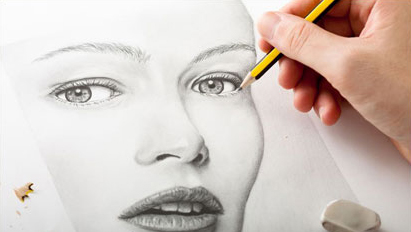
Today we'll show you how to draw hair.
The
difficulty in drawing hair is learning how to depict it as soft and
movable while not spending hours trying to draw individual hairs.
Think
of hair as having three definite tones; highlights, shadows, and
lowlights, and begin by drawing the shape of the skull and deciding on
the general shape of the hair.
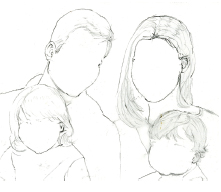
Block in the darks, or, shadow areas of the hair, working around the
highlights. It may be useful to squint at your reference if you're using
one, as this will help you to see the shape of the shadow and
highlight.
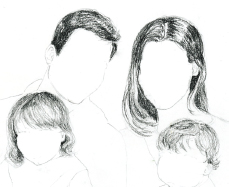
Build up the hair with a series of directional strokes that follow the growth pattern of the hair. Keep the hairline broken at the part and the forehead, and be sure that your hair follows the shape of the head.

Break
across the shadow areas with a few highlighted hairs that you pick out
with the kneaded or electric eraser, and draw a few fly away hairs
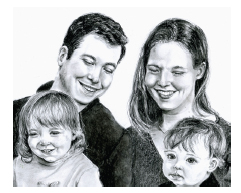
around the outside of the hair to keep it from looking too smooth. Touch
up the darks again as needed, and the hair is complete.
 Want To Learn More ...
Drawing Made Easy is a simple course which shows you step-by-step how to draw ...
- people
- hands
- eyes
- faces
... and a whole lot more from beginning to end, and a goldmine of sample illustrations for further ideas.
With clear (and fun) instructions on how to draw ... you'll learn at your own pace in the comfort of your home.
Warm Regards

Chris Elmore
Drawing Made Easy
Chris Elmore
Drawing Made Easy
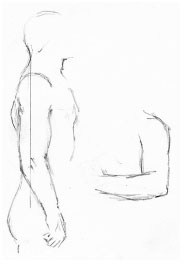
How To Draw Arms
Today we'll show you how to draw arms.
When drawing arms, it is very helpful to be familiar with the bone and muscle structure.
When one understands that the forearm is made up of the ulna and radius, for instance...
...
it is easy to remember that the arm tapers from the shoulder to the
elbow, then flares out again to accommodate those two bones before
tapering down to the wrist.
Study the anatomy of the arm carefully, and drawing will be greatly simplified.
Begin
by sketching the shape of the arm. Keep in mind that even at its
relaxed state, the arm does not hang straight down, but bends slightly
at the elbow.
Also
note that if the arm is hanging at the side, there should be a straight
line from the back of the neck through the center of the arm until the
arm bends at the elbow.
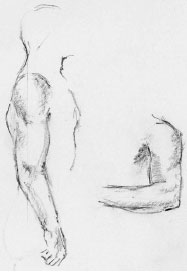
Draw
lines that indicate the deltoid muscle in the shoulder and other
muscles that may be visible, as well as a mark where the elbow, wrist,
and hand will be.
Build
up the appearance of muscles on the arm by shading and picking out
highlights. On the upper arm, you may see deltoids, biceps, and triceps
indentations.
On the lower arm, you will see a furrow beneath the ulna bone, especially if the arm is bent.
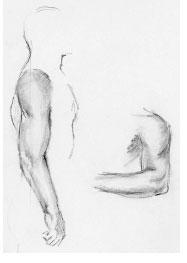
You
may need to reshape the arm if your sketchy strokes were too straight;
contrary to appearances, the arm is almost never straight, but a series
of slight in and out curves.
Blend the shaded tones following the curve of the arm and pick out highlights on the tops of the muscles with a kneaded eraser.
You may need to add the darks again if they were lightened in the blending process.
 Want To Learn More ...
Drawing Made Easy is a simple course which shows you step-by-step how to draw ...
- people
- hands
- eyes
- faces
... and a whole lot more from beginning to end, and a goldmine of sample illustrations for further ideas.
With clear (and fun) instructions on how to draw ... you'll learn at your own pace in the comfort of your home.
Warm Regards
Chris Elmore
Drawing Made Easy
Chris Elmore
Drawing Made Easy
East-West Marinated Asparagus

East-West Marinated Asparagus
Ingredients
-
3 poundsfresh asparagus, trimmed (48 to 60 medium-size spears)
-
1/3 cuplow-sodium soy sauce or tamari
-
1/3 cuprice vinegar
-
3 tablespoonsvegetable oil
-
3cloves garlic, minced (1 tablespoon)
-
2 tablespoonsgrated fresh ginger
-
1 tablespoonagave nectar or honey
-
Pinch cayenne pepper, or to taste
-
1 tablespoontoasted sesame seeds
-
1Thai bird chile, seeded and thinly sliced for garnish, optional
Directions
1.
Cook asparagus in pot of boiling salted
water 5 minutes. Drain, and plunge into bowl filled with ice water.
2.
Whisk together soy sauce, rice vinegar, oil,
garlic, ginger, agave nectar, and cayenne. Pour over asparagus in large
baking dish, adding water, if necessary, to submerge asparagus. Cover,
and chill 4 hours, or overnight.
3.
Drain off marinade, and arrange asparagus on
plates or serving platter. Sprinkle with sesame seeds and chile slices,
if using.
Nutrition information
Per Serving:
cal. (kcal) 51,
Fat, total (g) 2,
sat. fat (g) 1,
carb. (g) 6,
fiber (g) 2,
sugar (g) 2,
pro. (g) 3,
sodium (mg) 202,
Percent Daily Values are based on a 2,000 calorie diet

Grilled Texas Rib Eye

Grilled Texas Rib Eye
Recipe from

Most American
cooks buy beautifully marbled rib eye steaks without the bone, but Tim
Love opts for the heftier bone-in variety. To help keep the steaks
extra-juicy, he sears them on the grill, then lets them rest before he
finishes cooking.
Servings:
10
Prep Time:
35 mins
Total Time:
1 hrIngredients
-
3 1 1/2 poundsbone-in ribeye steaks, at room temperature (about 1-inch thick)
-
Canola oil
-
Kosher salt and coarsely ground black pepperDirections1.Light a grill and heat, covered, until hot. Brush the steaks with oil and season with salt and with pepper. Grill the steaks over high heat for 1-1/2 minutes on each side. Transfer the steaks to a carving board and let rest for 10 or up to 30 minutes.2.Return the steaks to the hot grill, cover and cook for 4 to 6 minutes, turning once; the steaks are done when an instant-read thermometer inserted in the center of the meat registers 130 degrees for rare or 135 degrees for medium-rare. Return the steaks to the carving board and let rest for 10 minutes. Thinly slice the steaks across the grain and serve.SERVE WITH
1.Mixed green salad.
Lesson: How To Draw Proportion & How To Draw The Chin And Neck
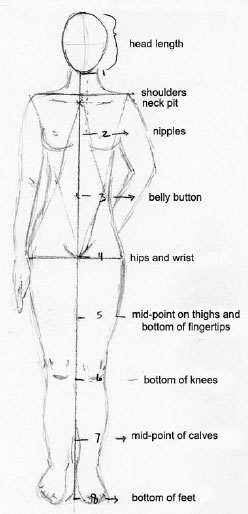
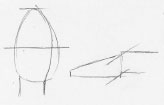
How To Draw Proportion
Today we'll show you how to draw proportion.
Every
feature of the face and body follows its own rules of proportion, or,
measurement in comparison to the features around it.
While
these rules may be broken or bent from person to person, the general
guidelines will apply to most, and so are extremely helpful to keep in
mind when drawing realistic faces and figures.
-
The adult body is approximately eight head lengths long, with the legs joining the body at the halfway point.
The shoulders begin a little less than halfway between the first head length, and by drawing a double triangle between the shoulders and hips, you can easily see the waist.
Every other head length represents a different start, stop, or midpoint of the rest of the body as shown here.
-
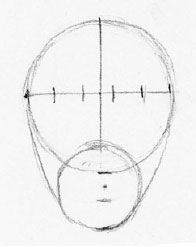
The head is about five eye lengths across, so you can begin to draw a proportional head by drawing a straight line divided into five equal sections.
Draw a circle around the line to represent the top of the head, and mark off two more eye lengths going down from the bottom of the circle.
Draw a second circle around these lengths, and you now have two circles which, connected with rounded lines, form a head.
-
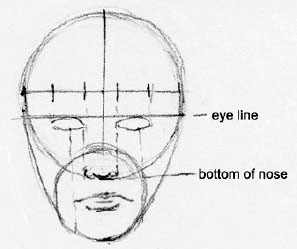
If you draw a line straight across the head from the points where the lines join the two circles together, you have a guideline for the top of the eyes.
The line that marks the bottom of the uppermost circle becomes a guide for the bottom of the nose, and the lips fall half an eye length below that point.
How To Learn More ...
Drawing Made Easy is a simple course which shows you step-by-step how to draw ...
- people
- hands
- eyes
- faces
... and a whole lot more from beginning to end, and a goldmine of sample illustrations for further ideas.
With clear (and fun) instructions on how to draw ... you'll learn at your own pace in the comfort of your home.
Warm Regards
Chris Elmore
Drawing Made Easy
Chris Elmore
Drawing Made Easy
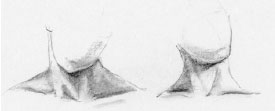
How To Draw The Chin And Neck
Today we'll show you how to draw the chin and neck.
When drawing the neck, it's important to remember that the lines are not parallel, even though they seem to be.
The neck is not a pole that attaches the head to the body, it is a movable column that tapers and curves.
There are also differences between male and female necks; males have a
more pronounced adam's apple and are generally more heavily muscled,
while female necks are more slender and graceful.
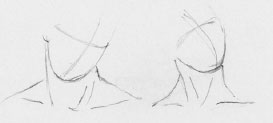
Begin
by lightly drawing the main shape of the neck and chin, including both
the outside lines and lines that indicate flexed tendons or muscles and
the collarbone.
Draw
carefully to make sure that the angle of the neck is correct; even in
the relaxed, forward looking position, the neck is not straight up and
down, but tilts forward slightly.
Erase
guidelines and begin to replace lines with shading that will show the
curves of the neck and chin, always being careful that your strokes
follow the curves of the neck and chin.
You may also need to make adjustments to the line of the chin. Try to
envision the bones and muscles under the skin as you work; this will
help remind you where the lights and darks should fall.
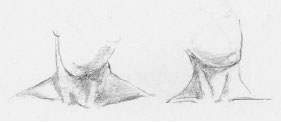
Finish
the drawing by blending tones with a stomp or tortillon, picking out
highlights with the kneaded eraser and dropping in deeper shadow areas
as necessary.
Experiment
by drawing the neck from forward, side, and back views, and improve
your understanding of the area by drawing from life.
Have your model turn the neck, look up, and look down to see how different movements affect the neck and chin.
 Want To Learn More ...
Drawing Made Easy is a simple course which shows you step-by-step how to draw ...
- people
- hands
- eyes
- faces
... and a whole lot more from beginning to end, and a goldmine of sample illustrations for further ideas.
With clear (and fun) instructions on how to draw ... you'll learn at your own pace in the comfort of your home.
Warm Regards
Chris Elmore
Drawing Made Easy
Chris Elmore
Drawing Made Easy
Mental Cleanse Call Recordings - Chapter 2

The recorded audio for the 3 PM ET call:
http://mffaudios.com/audios/2014-09-24-3PM.htm

The recorded audio for the 8 PM ET call:
http://mffaudios.com/audios/2014-09-24-8PM.htm

Now we move onto Chapter 3.

NOTE: We will be purging our member database this weekend
to cut down on our server mailing resources.

If You have NEVER posted a Lesson AND have not logged into
the Forum in the past 60 days, then Your account will be removed.

To stop receiving these notices, click on the Profile tab
after You log into the Forum, and Delete Your Account.
You can always read everything as a Guest.

To unsubscribe from these announcements, login to the forum and uncheck "Receive
forum announcements and important notifications by email." in your profile.

You can view the full announcement by following this link:

http://30daymentalcleanse.info/index.php?topic=12530.0

Regards,
The 30-Day Mental Cleanse Team.
Curried Cider-Pork Stew
Curried Cider-Pork Stew
Recipe from


This hearty
one-pot meal combines all your family's favorite ingredients--pork,
apples, carrots, and butternut squash--into a satisfying soup recipe.
Servings:
6
Prep Time:
35 minsIngredients
-
2 poundsboneless pork shoulder
-
4medium red and/or green crisp-tart cooking apples
-
1 tablespooncooking oil
-
1large onion, cut into thin wedges
-
2 teaspoonscurry powder
-
1 14 ounce canchicken broth
-
2/3 cupapple cider or apple juice
-
1/4 teaspoonsalt
-
1/4 teaspoonground black pepper
-
12 ouncesbaby carrots with tops, trimmed, or packaged peeled baby carrots
-
2stalks celery, sliced
-
1 - 1 1/2 poundsbutternut squash, peeled, seeded, and cubed (2 cups)
-
Sour cream, shredded orange peel, snipped fresh oregano and/or freshly ground pepper (optional)
Directions
1.
Trim fat from pork; cut pork in 1-inch cubes. Peel, core, and chop two apples; set aside. In a 4-quart Dutch oven brown pork, half at a time, in hot oil; return all pork to pan. Add chopped apples,
onion, and curry powder; cook and stir 2 minutes. Add broth, cider,
salt, and pepper. Bring to boiling; reduce heat. Simmer, covered, 30
minutes, stirring occasionally.
2.
Add carrots and celery to pork mixture;
return to boiling. Reduce heat; simmer, covered, 20 minutes, stirring
occasionally. Cut remaining apples into 1/4-inch-thick wedges. Add apples and squash to pan. Cover; cook 10 to 12 minutes or until pork and vegetables are tender. Serve with sour cream, orange peel, oregano and pepper.
Makes 6 servings.
Nutrition information
Per Serving:
cal. (kcal) 379,
Fat, total (g) 14,
chol. (mg) 102,
sat. fat (g) 4,
carb. (g) 31,
Monosaturated fat (g) 6,
Polyunsaturated fat (g) 2,
fiber (g) 6,
sugar (g) 15,
pro. (g) 32,
vit. A (IU) 15646.05,
vit. C (mg) 30.7,
Thiamin (mg) 1.47,
Riboflavin (mg) 0.57,
Niacin (mg) 8.49,
Pyridoxine (Vit. B6) (mg) 0.94,
Folate (µg) 60.48,
Cobalamin (Vit. B12) (µg) 1.28,
sodium (mg) 526,
Potassium (mg) 1166,
calcium (mg) 100.97,
iron (mg) 3.42,
Percent Daily Values are based on a 2,000 calorie diet
Wednesday, September 24, 2014
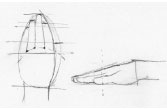
Lesson: How To Draw Hands
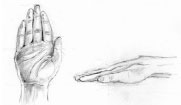
Drawing hands will vary greatly depending on the age of the person and the way the hands are being held.
But here we will look at simplified methods for drawing an adult hand seen from two angles.
Begin by drawing the largest shapes. Guidelines will help to indicate the angle of the hand as well as where fingers will go.
Lightly
sketch lines to divide fingers into their simplest form. An arc drawn
across the halfway line will determine the knuckle line.
All of the fingers are approximately equal thickness at this point,
though the length varies with the middle finger being longest.
From
the side, divide the trapezoid in half to find where the thumbnail
begins and sketch in the finger and wrist shapes from there.
Erase the guidelines and begin sketching in lines to indicate knuckle placement and fingernails.
If lines on the palm are visible, sketch those in lightly too. You will
also begin to reshape the individual fingers slightly where necessary.

Begin
shading the hand by sketching in the shapes of the largest shadows.
When you're satisfied that the shadows are in the correct place, blend
the graphite to smooth the tones, being careful to follow the shape of
the fingers and hand with your strokes.
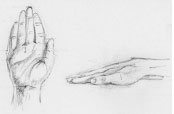
To finish, pick out highlights on fingernails, knuckles, and other protuberant parts with the kneaded eraser.
You
may also need to darken areas of high contrast as you go. Hands are
extremely difficult to draw, so don't be discouraged -- just keep
practicing!
 Want To Learn More ...
Drawing Made Easy is a simple course which shows you step-by-step how to draw ...
- people
- hands
- eyes
- faces
... and a whole lot more from beginning to end, and a goldmine of sample illustrations for further ideas.
With clear (and fun) instructions on how to draw ... you'll learn at your own pace in the comfort of your home.
Warm Regards
Chris Elmore
Drawing Made Easy
Chris Elmore
Drawing Made Easy

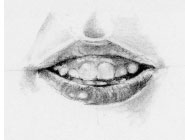
Lesson: How To Draw Teeth
Today we'll show you how to draw teeth.
Many
of the same principles applied to drawing lips will apply when drawing
teeth, because of course the lips are still visible, though parted.
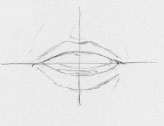
Begin by drawing the basic shape of the two lips and a guidelines that
indicate the center of the mouth vertically, horizontally, and the plane
that the teeth are on.
These lines will help ensure that the mouth doesn't slope crookedly.
Use light, sketchy strokes; it is very easy to overdraw lines,
especially when drawing the mouth and teeth.
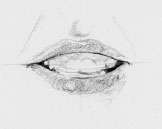
Erase
guidelines and begin to shade in the areas of greatest contrast. These
will be the corners and inside of the mouth, the bottom of top lip and
top of bottom lip, and the bottom of the bottom lip.
The
top lip is slightly darker than the bottom lip, and there is usually a
highlight that extends across the middle of the bottom lip. Instead of
drawing the teeth, define them by shading the areas around them.
Add
details such as the lines on the bottom lip that indicate where the
skin puckers, and lightly (with a hard pencil, 3H or greater) add a few
lines that show division between the teeth. Blend the darks to soften
the lips, and add back in more darks if needed.
Remember
that the teeth follow the curve of the mouth, and so the back teeth
will be in shadow. There will also be a shadow over the top quarter or
so of the teeth (or gums, if they're visible) cast by the upper lip.
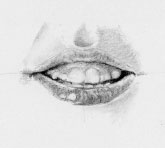
Pull
out highlights on the front upper teeth and define the line of the lips
by pulling out a line of highlight across the top lip and in places on
the bottom lip.
Add finishing touches by blending, darkening, and lightening as needed.
 Want To Learn More ...
Drawing Made Easy is a simple course which shows you step-by-step how to draw ...
- people
- hands
- eyes
- faces
... and a whole lot more from beginning to end, and a goldmine of sample illustrations for further ideas.
With clear (and fun) instructions on how to draw ... you'll learn at your own pace in the comfort of your home.
Warm Regards
Chris Elmore
Drawing Made Easy
Chris Elmore
Drawing Made Easy

Monday, September 22, 2014
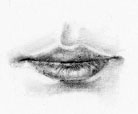
Lesson: How To Draw A Mouth
Mouths are very tricky because so much depends on subtlety.
Use a very light touch, especially in the beginning stages, to make sure that you don't outline the shape of the lips too much.
Otherwise this will result in a clownish, "drawn-on" look.
Sketch the shape of the upper and lower lip, remembering that on a
head-on view the ends of the mouth generally line up with the middle of
the eyes.
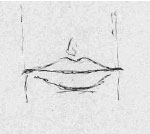
Divide the lips with a dark line, and add darks to the corners of the mouths as well.
These
areas are among the darkest places on the face, so don't be afraid to
lay down graphite with a very soft pencil--4B or so.
Add light shading to the upper lip, and to the top and bottom of the bottom lip. There will generally be a highlight across the center of the bottom lip, because it is a fleshy area that protrudes and catches the light.
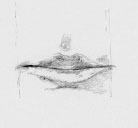
Add lines to the lips to indicate that the skin puckers. Use both lines and highlights to give the lip greater realism.
When the lines are in place, blend your darks to smooth the lips, re-adding more contrast where needed.
Remember that the lips follow the curve of the face, and so the corners will be darker than the front.
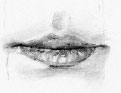
Pick
out highlights across the top of the lip and in places on the bottom.
This highlight will serve as the "line" of the upper lip; it will mark
the change in skin tone from cheek to lip and show the viewer where the
lips begin without outlining them.
Make any finishing touches in terms of highlights and darks to finish.
 Learn More ...
Drawing Made Easy is a simple course which shows you step-by-step how to draw ...
- people
- hands
- eyes
- faces
... and a whole lot more from beginning to end, and a goldmine of sample illustrations for further ideas.
With clear (and fun) instructions on how to draw ... you'll learn at your own pace in the comfort of your home.
Warm Regards
Chris Elmore
Drawing Made Easy
Chris Elmore
Drawing Made Easy
Subscribe to:
Posts (Atom)
-
 "An unwritten want is a wish, a dream, a never-happen. The day you put your goal in writing is the day it becomes a commitment that wil...
 -
 Having als is no fun. It is a very hard illness to accept. Nothing prepares you for it. Been diagnosed with it almost a year and half ag...